Martin TN 2011

Martin TN 2011
Poor Boys Sponsor Choice

July, 2011
Kristi with 1st place trophy at Big Sandy

Wrapped in plastic? Or is it Meguiar's Wax?
Cartoon

November 2004

The Hot Rod Creed
It goes like this.
Wide tires and traction bars
And headers to make her loud
We don't care how fast she runs
Just as long she goes WABBOW!


.jpg)


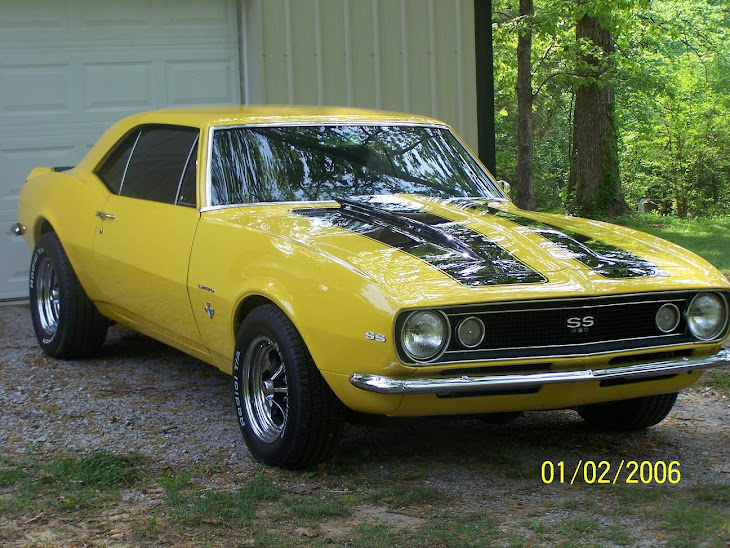
Camaro A Fire Breathing Dragon
A Fire Breathing Dragon By David Atkin
The camaro came out in 1967 to do battle against the mustang, which already had a head start by being introduced in 1964, as a spring off from the falcon, it was basically just a falcon with a new look, but the idea to upgrade a platform that they already had was pure genius, laying that aside, let’s talk about the camaro, when it came out Chevrolet was looking for the perfect combination to beat down the mustang, and they hit the nail on the head, a lot of the top Chevrolet dealers took the camaro under their wing, and really made it show it’s potential in the muscle car world.
The Z/28 camaro was brought out to do battle on the “SCCA” circuit or sports car club of America, and it was going to set some records during it’s time in the SCCA, the camaro’s arch enemy on the street and the track, has always been the mustang. The SCCA’S Trans Am series has especially magnified that rivalry, Ford took the championship in 1967 and 1970, Chevy dominated in 1968 and 1969, the driver for Chevrolet Mark Donohue had a stellar racing career, that included 29 career Trans Am victories, 3 championships, and a victory in the 1972 Indianapolis 500, he died in an on track accident in 1975.
The 302 cubic inch engine was added to Chevrolet’s line up, to meet the rules of the SCCA Trans Am series, which stated that your engine could be no larger then 305 cubic inches, the 302 became a mainstay for the Z/28 camaro, which had an option for a 350 CID engine, but the 302 had made a name for itself, in the collector circles, it’s the most sought after engine for the Z/28, a 302 with the cross ram option is worth a lot more cash the a standard 302 with a single four bar manifold, and when you add options like the JL8 four wheel disc brakes the price jumps to incredible proportions.
Then the high production Chevrolet dealers like Yenko Chevrolet, Bladwin Chevrolet, and Nicky Chevrolet would get a hold of these cars and turn them in to a monster, Yenko would create a beast called the “sYc” or Super Yenko Camaro, this car was set to amazing things on the drag strip, Yenko Chevrolet would contract Dick Herrel to drive this beast “Tricky Dick Herrel” as he was known by the racing world, Dick would power this car to a standing quarter mile time of 11.904 @ 115 MPH.
Standing 1/4 Mile Time* 11.904 @ 115 MPH0-60 Performance* 3.8 Seconds0-100* 8.9 SecondsEngine* 427 CID 425 HPPrice* $3,895Transmission* Muncie M-22 Rock Crusher 4 Speed
The sYc camaro would spawn the worlds fastest quarter mile car for that time era, this car was called the COPO 9560 or the ZL1 camaro, this car would come from the factory with an all aluminum 427 CID engine that was factory rated at 425 HP, but the car was consistently running 11.05’s. That means that you've got about 534.68 HP at the rear wheels, and about 695.08 HP at the flywheel, these were documented quarter mile runs, so I’m not just blowing up the truth, The ZL1 Camaro would prove to be an amazing race car, not to mention, it was still a street car also, in street dress Dick Herrel would achieve 1/4 mile times of 11.05 and in full race mode, with the headers uncorked and slicks added he would achieve a 10.35 1/4 mile time on his first run.
So for all of you Chevrolet nay Sayers, there you go.
Tell me of another car that can boast those numbers from the factory.
I've been in the automotive business for about 20 or 25 years, I have worked in all facets of the industry, from parts to restoration, all different makes and models, I just want to keep people interested in the old cars because it's where my heart is.
Article Source: http://EzineArticles.com/?expert=David_Atkin


A History Of The Chevrolet Camaro
Way back in 1964 the Ford motor company released a car known as the Mustang. The Mustang was released to to battle with the Chevrolet Corvette. The Ford motor company quickly discovered that the Mustang was not in the same class as the Chevrolet Corvette.
In 1967 Chevrolet introduced the Camaro; this car was in the same class as the Mustang. Still to this very day the battle between these two cars rages on. I will stick to the first generation of the Chevrolet Camaro for this article.
The 1967 Camaro was available with a wide variety of options. From the numerous engine options, to flashy paint, and interior options. This car was destined to become one of the mainstays of the Chevrolet motor company. Yes the Camaro made quite a reputation for itself.
When it was first released in 1967 sales of this car exploded. The Camaro created life long fans; fans who still love it to this day. Over the years I have done a lot of studying on the Camaro; because I am one of the life long fans of this great car.
The Camaro was offered in two body styles: the style first was a coupe, and the second a convertible. Both of these body styles were loved by the fans of the Camaro. The base Camaro came with a 3.8 liter straight back six. Most defiantly not the cream of the Camaro crop.
This engine was rated at 140 HP, and backed by a saginaw three speed transmission. There was also a Muncy 4 speed transmission available for this car, and a two speed Powerglide automatic transmission.
The two speed Powerglide was a popular option; until the turbo-hydromatic 350 transmission was released in 1969. There were four other engine options for the Camaro. They were the 307 CID small block Chevrolet, the 327 CID small block, the 350 CID small block, and the 396 big block for the SS model.
There were of course other engine options available; such as the 302 for the Z/28 Camaro. The special Camaros like the Yenko Camaro, the ZL1 Camaro, and the Baldwin-Motion Camaro. These were not your average Camaros though; they were high dollar, and very high performance cars.
These cars were modified by the dealerships, and ordered from the factory with special engines options. The Zl1 Camaro had an all aluminum 427 big block, that weighed the same as a small block engine. I guess you can imagine the advantage it had.
The Yenko Camaro, and the Baldwin-Motion Camaro both has a cast iron 427 CID engine, that was rated at 425 HP. If you know anything about the old days; these engines were way under rated in horsepower for insurance reasons.
By the time the 1969 Camaro hit the market; there were so many options available, that it became one of the most popular muscle cars ever built. The Camaro has had a long, and wonderful life as a muscle car. I truly hope that the new Camaro can keep the tradition alive.
In 1967 Chevrolet introduced the Camaro; this car was in the same class as the Mustang. Still to this very day the battle between these two cars rages on. I will stick to the first generation of the Chevrolet Camaro for this article.
Article Source: http://EzineArticles.com/?expert=David_Atkin
Article Source: http://EzineArticles.com/7279194


Read the First Chapter of My Restoration Tips Ebook Here!
To get the rest of the ebook,just sign up.
Muscle Cars!!
Table of Contents
Chapter 1 – Vintage Car Restoration
Chapter 2 – Things You Need
Chapter 3 – Before You Begin
Chapter 4 – Types Of Cars To Restore
Chapter 5 – Interior Restoration
Chapter 6 – Body Restoration
Chapter 7 – Mechanical Restoration
Chapter 8 – Accessories
Chapter 9 – Electrical Components.
Chapter 10 – Reassembly
Chapter 11 – Where To Get Help
Chapter 12 – Care Of Your Restored Car
Chapter 13 – Professional Car Restoration
Chapter 14 - Car Shows
Chapter 15 – Where To Get Parts
Chapter 16 – Twenty Quick Tips For Car Junkies
Chapter 17 – Top Websites For Car Junkies
Chapter 18 – The Car Is Yours!
This Is Giving You A Preview Of The Book!
Chapter 1
Do you love old cars? Vintage cars are shown by collectors throughout the country in shows and admired wherever they go. Owners of older cars that have been virtually brought back to life have a double sense of pride if they have performed the restoration themselves.
There is a difference between automobile restoration and simple rebuilding. A rebuilt car can contain any type of part. True restoration, consists of getting as much authenticity into the automobile as possible, right down to the hub caps. The car will only retain the value if it is restored back to its original condition, not rebuilt into a different car. While “pimping” a car may be popular at the moment, a restored car is supposed to take us back in time, not remind us of the present.
The process of car restoration encompasses not just the parts of the car that can be seen by others, but also the mechanical components should also be restored to their original condition.
Vintage car restoration is an art form unto itself. It takes people years to restore classic, vintage cars properly.
Vintage automobile restoration involves the process of disassembling the entire car, cleaning and either replacing or repairing the original parts and then reassembling the vehicle. In order for the car to maintain its original value, it must be restored with all of the proper parts. In most cases, the engine must be completely rebuilt.
A person who wants to restore a vintage automobile should have extensive knowledge about cars. Mechanical knowledge is as important as doing body work to the car. In most automotive shops, body work and mechanical work are two different trades. Someone who wants to restore vintage cars has to know both aspects of car repair.
In addition, a car restoration includes the interior of the car. It is usually more desirable to repair the upholstery, if at all possible. Naturally, you will not be able to get a replacement seat for a 1955 Chevy, but you can recover the seats in materials that mirror those used for a 1955 Chevy.
A car that is merely replaced with lookalike parts has not been properly restored. A vintage car can be worth quite a bit of money to a collector if it has been carefully restored to its original condition. This usually means that you will have to do quite a bit of searching to find parts and paint for your car.
Speaking of paint, you will want to use the original paint, if possible, to repaint the car. There are many different places where you can purchase the original car paint, or one as close as possible. We will be discussing places to purchase parts and accessories later in this book.
You need to have patience, time, space to work and money in which to buy parts and materials.
Most important of all, you must have a love for cars. If you love old cars and do not want to see them put to rest in the junk yard, this is your opportunity to give them a new lease on life.
Although it can be costly, the restoration can be done over a period of time to accommodate your budget. You will need a place to work on the car and storage for the automobile when it is not in use.
There are business that practice the art of vintage car restoration. They can generally restore a vintage auto in much less time than you will be able. Those who collect automobiles or do not have the time or inclination to work on the projects often send their cars to such businesses.
Money can also be made by learning how to restore vintage automobiles. Once you have successfully completed one restoration project, you may find you miss your hobby. It is common for people who restore automobiles to continue with this hobby throughout their lifetime. As they can only use so many cars, they often sell those they no longer want and make quite a profit.
Vintage automobile restoring is an art form unto itself. If you plan on doing this as a weekend project, it can take years. It is, however, well worth it. There is nothing like revving up the engine in the car that you lovingly restored back to life.
Tell me where to send the rest of the E-Book and the Newsletter.
Horse Power The Right Way
Once you have built that big bad engine for your muscle car, you'll need to be 100% sure that a few other things match the engine that you just built, this is another one of those times when you need to think about what it is you want the car to do, is it a daily driver, or a race car / show car.
What you use the car to do will change the set up of things like the rear end, suspension, and transmission immensely, you can divide the two things evenly, but it usually doesn't work very well to put a race engine on the street as your daily driver.
To get lower ET's at the drag strip the racers are usually running a low rear end gear, or ring and pinion set to lower their time when they run the ¼ mile, and the lower the rear gear, the harder it becomes to drive the car on the street every day.
Most of the real racers are running a gear set that has a 4.30:1 ratio or a a lot lower, while most street cars don't run a gear lower then 3.73:1, as a matter of fact it's more common to see even higher gears then that on the street, like 2.90:1.
Obviously the lower the gear in the rear end of your car, the harder it will be to take your car on the freeway around your city, the engine will rap out at a lower rpm, but this is ideal for a race car, when you build your engine, get the company that you buy your cam from to recommend the right gear set.
If you do what they tell you you'll get much better results with your car, but the gearing in the rear end is not the only thing to consider, if your running a four or five speed transmission in your car, you should know the first gear ratio, is it 1:1 or less like .85:1 or .90:1 this will help you also.
If your running an automatic transmission you'll need to match a stall converter to your cam shaft, which means that you need to look at the power band of your cam shaft, if it runs from 3,000 rpm to 6,500 rpm, then you'll need a converter that stalls at 3,000 rpm.
Let me give a very basic explanation of stall, with a standard transmission you'd have a clutch so you could get your car to it's power band before stepping off the clutch pedal, a stall converter does the same thing for an automatic transmission.
But it has some draw backs, your car won't drive normally until you hit your transmission stall speed, it will seem like you don't have the power that you should, or seem doggie, these are reasons to build a street engine for the street, rather then a race engine that you drive on the street.
You can't have the best of both worlds, and expect your car to be reliable for every day street driving, you can build a street / strip car, but you'll always give up some of the good reliable street habits of your car when you do, you'll always have to give up something to gain power in your engine.
Muscle Car Registry
I've been in the automotive business for about 20 or 25 years, I have worked in all facets of the industry, from parts to restoration, all different makes and models, I just want to keep people interested in the old cars because it's where my heart is.
http://autorevival.com
Ten Classic Muscle Cars
With the popularity of movies like The Fast and The Furious, Gone in Sixty Seconds and The last Ride, there has been some reference to the good old muscle cars which were immortalized in movies like Bullit, Vanishing Point and of course The Dukes of Hazzard series. This top ten list has a look at some of the muscle car icons born from the late 60’s and early 70’s.
The main measure of these cars is power, with Brake Horse Power (bhp) being the term flung around most commonly. What this refers to is the power released by the engine before the gearbox, generator, differential, water pump, and other components sap its power. If you are used to Kilowatts, then take into consideration that 250kw translates to 335.26bhp.
The 1969 Pontiac GTO
Conceptualised to gain appeal to the younger market, Pontiac put a 6.3 litre V8 engine into the midsized Tempest shell, making for a cheap fast car. To the surprise of Pontiac’s marketing team the GTO became massively popular and in 1969 they fitted it with a 6.5 litre V8 which could kick out 366bhp. The Judge was born.
The 1970 Buick GSX
Again the idea here was to squash a beast of an engine into a midsized body, in this case the Buick Skylark. In 1967 the Buick GS became recognised as a standalone model available as a sedan and convertible.
The 1970 model was given a monstrous 7.5 litre engine capable of producing 400bhp. The GSX body came in yellow or white only, adding to the image which made this car a distinct classic.
The 1967 Chevrolet Camaro
There were various options available to those purchasing a first generation Camaro, the Z28 package being the most exciting. With a 4.9 litre engine, power steering, disc brakes on the front and a four speed manual gearbox, the Z28 was made for racing – producing up to 400bhp.
The Plymouth Roadrunner
Built to beat 14 seconds over a quarter mile, the Plymouth Roadrunner was stripped down to the bare essentials, sacrificing even the carpets in order to make this into a beast of a machine. It featured a beefed up steering, brake and suspension systems and a 6.3 litre engine which pushed 335bhp. An optional boost came from the 7.0 litre version’s 425bhp.
The Dodge Challenger
Hitting the market in 1970, the Dodge Challenger was a hit from the get go, selling more than 80,000 in the first year. Although various options were made available, the R/T is the model which attracts the most attention with its 7.0 litre Hemi engine kicking out 425bhp. Later models lost the plot, with the ’72 model dropping to a measly 240bhp. See the Challenger in the cult classic movie, Vanishing Point.
The 1966 Ford Fairlane GT
Launched in ’62 with a 3.6 litre V8, the Ford Fairlane was given a makeover in 1966, complete with a 6.4 litre engine capable of 335bhp. As if this were not enough they decided to upgrade to a 7.0 litre NASCAR engine with 435bhp. Rigid front suspension and disc brakes gave the car better handling, and the brute power kicked the dial over 60mph (100km/h) in six seconds.
Oldsmobile 442
The Cutlass model was equipped with a police specification engine capable of 310bhp. The 442 refers to the four barrel carburettor, four speed manual gear box and the twin exhausts. The 442 had a reputation for its handling when compared to other muscle cars, thanks to its improved springs, shocks and the comforting safety of an anti-roll bar.
The 1968 edition was redesigned as a shapely coupe, with a 7.5 litre block blasting 390bhp.
Plymouth Barracuda
Although the Barracuda was launched in 1964, just a couple of weeks before the Ford Mustang, it was not until 1970 that Plymouth gained wider popularity with sexy lines and some serious growl under the hood in the form of a 7.2 litre 390bhp. The other choice was a smaller 7.0 litre Hemi block which knocked out some extra power at 425bhp!
Even with a revamped suspension the power was so much that the ‘Cuda gained a reputation for difficult handling.
The 1970 SS Chevy Chevelle
The 1965 Chevelle SS sported a 6.5 litre block pushing 375bhp, which was all too much for the front end of the car, making for some pretty horrible handling. Luckily this was addressed with the revamping of the suspension and the addition of disk brakes on the front.
1969 saw the introduction of the top engine spec, which was featured in the El Camio pick-up as well. The 1970 SS was powered by a 7.4 litre V8 with 450bhp pulling the Chevell to 100km/h in just six seconds. Later models were adjusted for unleaded fuel and the power output suffered considerably.
Dodge Charger
Bo and Duke’s ride of choice, the Charger was launched in 1966 and some 37,000 cars were sold in the first year. A 7.0 litre Hemi reputedly kicked out around 500bhp, though it was officially rated at 425bhp. This monster reached 100km/h in just five and a half seconds. The Hemi engine option was available until 1972.
Mens Lifestyle is a site for men who are looking to live a lifestyle of health, wealth and adventure. The idea is to bring together the tips, tools and products that will help you make more money, live healthier and enjoy your life that much more.
Article Source: http://EzineArticles.com/?expert=Roger_Theron


.jpg)
.jpg)
Tip to restoration of your engine compartment
I thought I'd talk a little about the restoration of your engine compartment, since it is one of the problem areas in a lot of car restoration projects, the first thing that you usually notice, it's the the engine compartment so it's full of grease, and of course an engine, so the first thing that you need to do is pull the engine out of the car, it's a lot easier to pull the transmission with the engine, and pull them as a single unit.
You'll notice once you do this, that it's a lot greasier then you thought, but now you can at least get to it to clean it up, first I'd take a steam cleaner to it, and see how much of the grease and years of dirt an road grime that will take off, and don't be thinking that this will be fast, once you can see that the steam cleaner is not getting any more of the grime out of the engine compartment, go ahead and put some degreaser on the areas that are still bad, and give the degreaser about 30 minutes to loosen up the grime.
After that, you guessed it, it's back to steam cleaning again, what this doesn't get, you'll be scraping off, so be prepared to get dirty, now there is always dirt and road grime that the steam cleaner will not remove, unless the person who owned the car before you was vary in love with his car, and cleaned the engine compartment regularly, this will without a doubt make a big difference in what you have to do to get it clean, once your through scarping all of the grime off, you can break out that steam cleaner again, and give it one last shot.
After that you'll need to take some acetone, or something like it and do your final clean up of the engine compartment, you'll know it's clean when you don't see any more black on you cleaning rags, once you get to this point, it's time to determine what needs to be fixed in the engine compartment before you can start prepping it for paint, look around for any rust, or dents that need to be fixed, you'll know the rust by how it looks, rust will show up as bubbles in the paint, pits in the paint, or just big ugly holes, now if you see some bubbles in the paint in you engines compartment, first scrape the top of them off, and then check to see how bad the rust is by "Lightly" tapping the rusted area with a pick hammer, if the hammer puts a hole in you engine compartment, you'll know that the rust was to an advanced stage, and you'll need to repair it before you can go any farther on your project.
To repair that rust hole, or any rust hole, you'll need to determine how large the effected area is, and I suggest that you draw a line around the area, after you do that, you'll need to be sure that you have a die grinder with a cutting blade installed on it, what you'll do now is plug your die grinder in to the air chuck, and then follow the line that you drew around the rusted area, and do yourself a favor, and cut a little at a time, make one pass over the line that you drew, just to give yourself a guide for the die grinder, all you'll be doing here is passing your die grinder over the guide lines that you created until the rusted area is cut out of the engine compartment, now you should de-bur the area that you cut out.
After you get the area all cleaned up, take some two inch masking tape and put it across the hole, and then take a sharpie and follow the outline of the hole, pull it off of the hole and put it on the piece of sheet metal that your going to use to fix the hole in your engine compartment, take your die grinder and work around the line until you've cut out a piece of metal in the shape of the rust hole in your engine compartment, by now you can see where I'm going with this whole idea, OK now take that piece of metal and fit it in the hole in your engine compartment, now that you've got it all fit in place, it's time to find a way to make it stay there while you weld it in, I usually use Visegrips to do this, but how you hold it in place is all up to you, you will want to make sure that it sits in place as level as possible, it will be a lot less work to finish the job if you do this, when you begin to weld the plate in place, your not going to run a solid bead around it all at one time, it will be a solid bead in the end, but work from one side to the other, and do about a one inch weld at a time, otherwise you'll warp the metal, and cause a lot more work for yourself , so when you start, you'll have a one inch inch bead on all four sides holding the metal in place.
Once you have made a solid weld bead around the entire patch panel, you can once again get your die grinder out, and this time put a grinding blade on it, and grind the wed bead flat, once the is done, take a dual action sander, or "DA" and put some 180 grit sand paper on it, and smooth out the rough areas in the paint, that the die grinder made, and the rough up the bare area again with some 80 grit paper, after that is done get out your mixing board, and metal glaze and mix up some metal glaze and spread it over the patched area, and then sand it with 80 grit paper on a hand block, and if needed, repeat this process again until the area is smooth and just a little high, and then load that block with 180 grit paper and level out the high spot.
Now you'll need to primer the area that you just repaired, I would use a urethane primer for this, the brand is up to you, depending on the brand, mixing instructions will change, so be sure to ask you paint supply house to explain to you how to mix the brand that you choose, the one thing that doesn't change in the flash time between coats, this should be about 15-20 minutes, and you should lay at least 3-4 medium wet coats of primer on the repaired area, after you get this done, you'll want to spray a guide coat on the primer, so when you begin to sand the primer, you can see that high or low spots in your repair work, and usually you'll have one, the other, or both, now that you have your guide coat on the primer, and the primer has had time to dry, I would give it no less then four hours to dry, but even better yet 12-24 hours of dry time. Now that it's dry, load that hand block with 180 grit paper and sand the guide coat off, you'll notice that their are high or low spots in your work, you'll need to determine if primer will fill it, or if you need more glaze to be applied to your work area.
For now let's say that your work was smooth and right the first time, so now your done fixing the rusted area, you'll need to get a a bucket and put some warm water in it, and this will be your wet sanding bucket, and a water spray bottle is nice to have also, now you'll need 600 grit wet sand paper to sand you engine compartment, this is of course if the rest of the engine compartment is free of dent, dings, and nicks in the paint, once you know that it is you can sand the entire engine compartment with wet 600 grit sand paper, and the areas that you can't reach wit that, you can use a gray scotch brite pad, once the entire engine compartment is dull, you can then use a prep cleaning solvent to clean it up, and make sure that you get all of the residue from wet sanding out of the engine compartment.
Your now ready to spay the paint, after you mask the rest of the car off, so you don't get paint where you don't want it.
Well cover that painting of the engine compartment in the next article.
I've been in the automotive business for about 20 or 25 years, I have worked in all facets of the industry, from parts to restoration, all different makes and models, I just want to keep people interested in the old cars because it's where my heart is.
http://autorevival.com
ZL1 Corvette Registry
How to restore your car
Article Source: http://EzineArticles.com/?expert=David_Atkin
Chevrolet Camaro - One of the Most Popular Cars for Modification
.jpg)
Chevrolet Camaro - One of the Most Popular Cars for Modification in the Automotive History
By Harry Rockwell
The Chevrolet Camaro was a compact car introduced in North America by the Chevrolet Motor Division of General Motors at the start of the 1967 model year as competition for the Ford Mustang.
Although it was technically a compact (by the standards of the time), the Camaro, like the entire class of Mustang competitiors, was soon known as a pony car.
Though the car's name was contrived with no meaning, General Motors researchers found the word in a French dictionary as a slang term for "friend" or "companion." Ford Motor Company researchers discovered other definitions, including "a shrimp-like creature" and an arcane term for "loose bowels"! In some automotive periodicals before official release, it was code-named "Panther".
Four distinct generations of the car were produced.
Generation 1
1967
Sharing mechanicals with the upcoming 1968 Chevrolet Nova, the Camaro featured unibody structure. Chevrolet offered the car in only two body styles, a coupe and convertible. Almost 80 factory and 40 dealer options including three main packages were avaible.
* RS Package included many cosmetic changes such as RS badging, hidden headlights, blacked out grill, revised taillights and interior trims.
* SS Package included modified 5.7 L (350 in³) V8 engine (first 350 in³ engine ever offered by Chevrolet), also L35 396 in³ "big block" was avaible. SS featured non-functional air inlets on the hood, special striping and blacked out grill. It was possible to order both - RS and SS packages to receive RS/SS Camaro. In 1967 Camaro RS/SS Convertible Camaro with 396 in³ engine paced the Indianapolis 500 race.
* Z28 option code was introduced in 1966. This option package wasn't mentioned in any sales literature so was unknown by most of the buyers. The only way to order Z28 package was to order base Camaro with Z28 option, front disc brakes, power steering and Muncie 4-speed transmission.
Z28 package featured unique 302 in³ "small block" engine, designed specifically to compete in the Club of America Trans Am racing series (which required engines smaller than 305 in³ and public availablity of the car).
Advertised power of this engine was listed at 290 hp (216 kW) while actual dyno readings rated it at 360 to 400 hp (269 to 298 kW). Z28 also came with upgraded suspension and racing stripes on the hood. It was possible to combine Z28 package with RS package. Only 602 Z28's were sold.
Generation 2
The larger second-generation Camaro featured an all-new sleek body and improved suspension. The 1970-1/2 Camaro debuted as a 2+2 coupe; no convertible was offered and would not appear again until well into the third generation.
Most of the engine and drivetrain components were carried over from 1969 with the exception of the 230 in³ (3.8 L) six cylinder -- the base engine was now the 250 in³ (4.1 L) six rated at 155 hp (116 kW).
The top performing motor was a L-78 396 in³ (6.5 L) V8 rated at 375 hp (280 kW). (Starting in 1970, the 396 in³ big block V8's actually displaced 402 in³ (6.6 L), yet Chevrolet chose to retain the 396 badging.) Two 454 in³ (7.4 L) engines - the LS-6 and LS-7 - were listed on early specification sheets but never made it into production.
Besides the base model, buyers could select the "Rally Sport" option with a distinctive front nose and bumper, a "Super Sport" package, and the "Z-28 Special Performance Package" featuring a new high-performance 360 hp (268 kW) 350 in³ (5.7 L) cid V8. 1972
The 1972 Camaro suffered two major setbacks. A UAW strike at a GM assembly plant in Ohio disrupted production for 174 days, and 1100 Camaros had to be scrapped because they did not meet 1973 Federal bumper safety standards.
Some at GM seriously considered dropping the Camaro and Firebird altogether, while others were convinced the models remained marketable. The latter group eventually convinced those in favor of dropping the F Cars to reconsider, and Chevrolet would go on to produce 68,656 Camaros in 1972, the lowest production numbers for any model year.
Generation 3
1982
The 1982 model introduced the first Camaros with factory fuel injection, four-speed automatic transmissions (three-speed on the earlier models), five-speed manual transmissions (four-speed manual transmissions in 1982, and some 83-84 models), 15 or 16-inch rims, hatchback body style, and even a four-cylinder engine for a brief period (due to concerns over fuel economy).
The Camaro Z28 was Motor Trend magazine's Car of the Year for 1982.
1985
In 1985 Chevrolet introduced a new Camaro model - the famous IROC-Z, called after popular racing series. IROC-Z Camaro featured upgraded suspension, special decal package and Tuned Port Injection system taken from the Chevrolet_Corvette Third generation Camaros also had a suspension system that was more capable in corners than the previous generation.
The Camaro IROC-Z was on Car and Driver magazine's Ten Best list for 1985.
Engines
* 1978-1981 5.7 L (350 in³) Small-Block V8* 1982-1985 2.5 L (151 in³) Iron Duke L4* 1982-1984 2.8 L (173 in³) LC1 V6* 1985-1989 2.8 L (173 in³) LB8 V6* 1990-1992 3.1 L (191 in³) 60 Gen II V6* 1982-1992 5.0 L (305 in³) Small-Block V8* 1985-1992 5.7 L (350 in³) Small-Block V8
Generation 4
1993
1993 began the fourth and last generation of Camaros, lasting through the 2002 model year. Production of the fourth and final generation was moved from GM's Van Nuys, California assembly plant to one in Ste. Therese, Quebec in 1993.
Though the car would no longer be produced in the US, the new design which incorporated lightweight plastic body panels over a steel space frame, and a better suspension, further improved upon the Camaro line.
From 1993 to 1997 the Camaro was available with the LT-1 engine, the same Generation II small block V8 used in the Corvette, although in slightly de-tuned form.
In 1996, the long-discontinued "SS" option was resurrected and in 1998, the all-new LS-1 engine Generation III small block was offered on the SS and Z28 Camaros, marking the end of the Generation I small block V8 that had its roots in Chevrolet's 265 in³ engine of 1955. Unfortunately, sales were below expectations, and production of the Camaro ceased in 2002. 1998
1998 saw a new head light design for the Camaro. The new design removed the previous recessed-light design present in the 1982-1997 Camaros. The faux air intakes on the hood were also eliminated. In addition the LT1 engine was removed and instead an LS1 in its place. Engines
* 1993-1995 3.4 L (208 in³) 60 Gen III V6* 1995-2002 3.8 L (231 in³) 3800 Series II V6* 1993-1997 5.7 L (350 in³) LT1 V8* 1998-2002 5.7 L (350 in³) LS1 V8
2002
2002 marked the last year of the Chevrolet Camaro and was also the 35th anniversary for the Camaro. This milestone was celebrated with a special anniversary car modified from the factory by SLP. The anniversary package was only available on the SS (Super Sport).
Engine modifications were available in addition to the 325 hp (242 kW) engine which all Super Sports produce. Silver racing stripes down the hood and trunk lid made the car more noticeable than ever—especially against the Bright Rally Red paint (the only color available with the anniversary package).
The car also had the slogan attached to it “Leave a Lasting ImpreSSion” and had the logo embroidered in the seats. The car was only available as a convertible or with T-Tops. 3,000 Camaros with the anniversary package were produced for the United States and 152 for Canada.
Though production Camaros were never as fast as the flagship Corvette, the car cost less than half as much and was easily modified. If its frequent inclusion in automotive enthusiast magazines is any indication, the Chevy Camaro is one of the most popular cars for modification in the automotive history.
Throughout its history, the Camaro shared its internal body and major components with a sister car - the Pontiac Firebird.
chevy camaro - Take advantage of information on this prestigious car brand. Learn about its rich heritage, about chevrolet & the importance of this brand for GMC. Details on its technicalities have been dealt with in detail.
Article Source: http://EzineArticles.com/?expert=Harry_Rockwell
Classic car auction


Understanding Classic Car Auctions
By Andy Jefferson
Classic car auctions have always been a perennial favorite amongst car lovers, both young and old. So much so, that some of them willingly fork over huge sums of money just to get their hands on a rare classic car!
Now this article will shed some light for those of you who aren't very familiar with these types of auctions, so you might want to pay close attention!
First up, a classic car auction is a great event to check out all of the different types and models of rare cars belonging to different eras. But since the classic car market is a fairly tight niche, cars are often sold at high prices, compared to other car auctions. And because of this, most classic cars are often not sold at all.
Don't let this deter you from bidding on one though. A classic car at an auction will probably cost you less the amount you'd have to pay to a private owner. Besides, not all cars are sold at exorbitant prices; once in a while, you do come across a great bargain you can take advantage of - you'll just have to keep your eyes open!
There aren't that many classic car auctions around though, so you want to do some research. A good idea would be to flip through popular magazines and other publications that cater to this niche. You could also do a search on major search engine such as Google and Yahoo. Here are some great websites you might want to check out:
* http://www.classic-auctions.com/
* http://www.classic-carauction.com/index.cfm
* http://www.coys.co.uk
There's a ton of other classic car auction websites, so have fun browsing around!
As mentioned before, this is a pretty small niche market, so you'll need to be armed with some 'insider' secrets if you want to dominate it. Now this doesn't mean you've got to be an 'expert,' but a good knowledge on classic car auctions will help in the long run. For instance, it's always better to know exactly what type and model you're looking to buy, because problems could arise between the seller and you if you were to return the car after paying for it.
For the budding car auction enthusiasts out there who're on the lookout for great deals... well, here's good news for you: you can find a limited selection of very rare cars for rock-bottom prices, if you don't mind spending a good amount of time hunting around!
Now here's a fair warning - once you do find the 'ultimate' classic car, be prepared to participate in a frenzied and often raucous bidding war. If you're absolutely delighted with it, there'll be plenty of other classic car auction fans who're likely to feel the same way as you do.
Finally, you need to keep in mind that some sellers out there can sell you cheap replicas of actual classic cars. The best way to avoid being ripped off, is to take along an experienced classic car auction buyer. That way, you'd feel much safer when handing over the cash in exchange for a classic car!
CarSaleAuction is an online portal with expert articles regarding professional car auction advice.
To discover effective methods for winning used car auctions, visit http://www.carsaleauction.com for free access.
Article Source: http://EzineArticles.com/?expert=Andy_Jefferson
Classic Car Insurance
Classic Car Insurance By Jeff Foote
You can insure a classic, antique, collector, or custom car the same way you insure any other vehicle. However, many classic car owners end up regretting this decision if their vehicle is totaled. Why? Because when your classic car is declared a total loss by a standard auto insurance policy, you will receive the actual cash value of your vehicle, which in most cases will be quite low and won't leave a smile on your face.
There are far better auto insurance policy options for classic car owners; however, you often have to meet certain criteria to apply for them.
You must have a minimum number of years of driving experience You cannot use the car for business purposes You must prove that you have another car that you use regularlyYou cannot drive the vehicle over a set number of miles per year
The automobile must be a certain number of years old
If you meet these criteria, then you may be able to purchase classic car insurance. However, not every auto insurance carrier will insure classic cars. When you find a carrier that does, the cost is usually less than what you would pay for a 'normal' vehicle.
The preferred type of auto insurance policy for classic cars is an agreed value policy. Before you buy a policy of this nature, you must sit down with an agent and concur on a value that will be paid in the event that your vehicle is totaled. Your agent will also give you a quote for this type of policy. So, if you are in an accident and the damages to your classic car are less than the agreed value, your insurance provider will pay for the repairs. If the cost to repair your vehicle is greater than the agreed value, you will receive your preset agreed amount. This is without question the preferred auto insurance policy for a classic car
Subscribe to:
Posts
(
Atom
)